Having fun with Computer Vision and Physics
Hi everyone, In my first blog post I’m going to explain how to combine computer vision and a little physics to create a simple environment for Augmented Reality. A few days ago I posted this video on LinkedIn:
I was surprised to see how many people reacted to this video and also I received many nice feedbacks from them. So I decided to write a blog post and explain how to create such applications. I hope it can be useful.
Let’s Break The Problem
We are going to solve this problem in three steps:
- Using a hand tracking model to find the position of hand
- Using a physics engine to handle the collision of balls and hand
- Giving the output of hand tracking to the physics engine and watching!
How To Solve The Hand Tracking Part?
Before the emergence of deep learning, hand tracking was a difficult task. you had to develop many hand-crafted features to detect the position of different parts of the hand. It could be more difficult If you wanted to track them in real-time. However deep learning models revolutionized computer vision so today you can solve problems like face detection, hand tracking, pose estimation, etc effortlessly.
Hand Tracking Using Your Own Model
You can train your own neural network for hand tracking, this is not very hard and what you need is a dataset of hand images and corresponding landmarks and a deep learning framework like PyTorch or TensorFlow. I suggest you try it at least once.
Hand Tracking Using Mediapipe
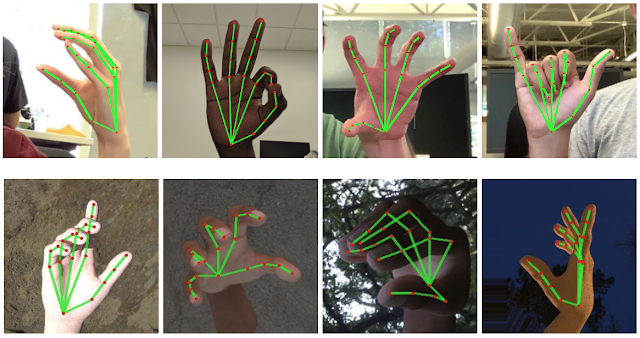
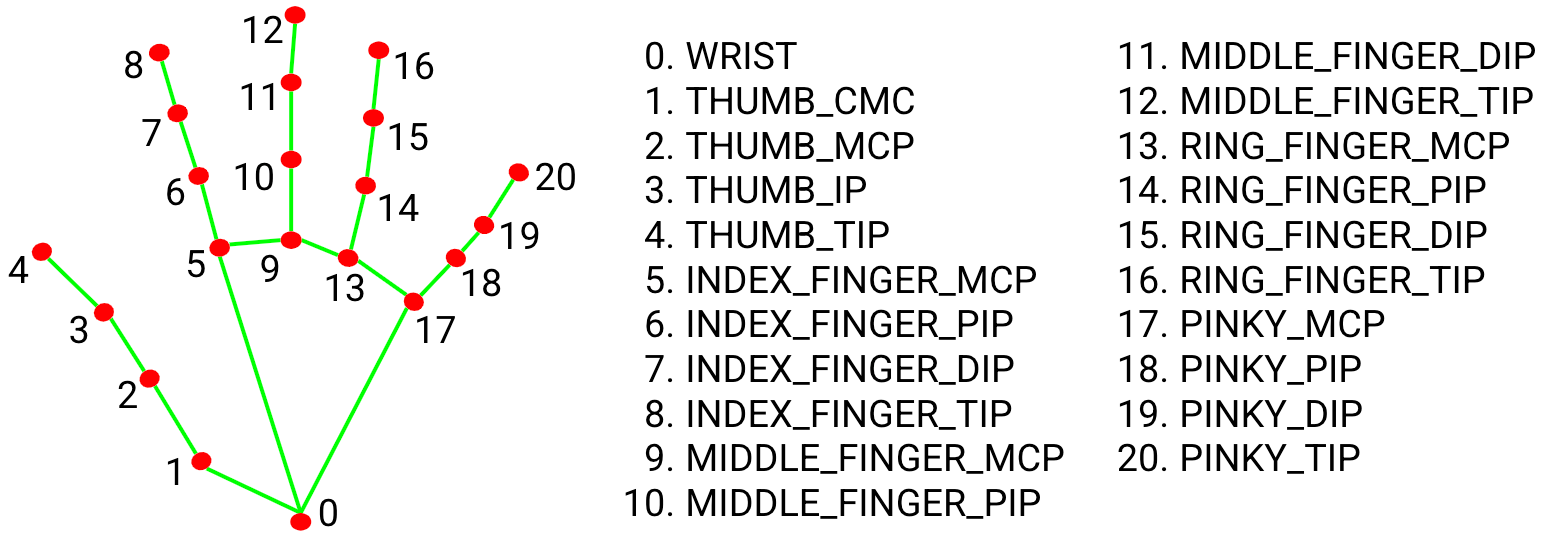
Despite it is not so hard to train a model for hand tracking, you can use available pre-trained models. one of the greatest libraries that can be useful here is Mediapipe developed by Google. Mediapipe not only has a very accurate hand tracking model but also has other models for face detection, face mesh detection, pose estimation, and many other computer vision problems. We can use its hand tracking solution for our project. The hand tracking model in Mediapipe can detect and track the following landmarks of hand:
You can read about hand tracking API here. Before using it for our project, Let’s see a simple example of using Mediapipe for hand tracking. First, you need to install Mediapipe, you can install it using pip.
pip install mediapipe
Note that you also need the OpenCV library. So let’s see an example:
import cv2
import mediapipe as mp

mp_drawing = mp.solutions.drawing_utils
mp_hands = mp.solutions.hands

# prepare webcam for reading the video
cap = cv2.VideoCapture(0)

with mp_hands.Hands(min_detection_confidence=0.5, min_tracking_confidence=0.5) as hands:

  while cap.isOpened():
    # read a frame from webcam
    success, image = cap.read()

    image = cv2.cvtColor(cv2.flip(image, 1), cv2.COLOR_BGR2RGB)
    image.flags.writeable = False
    # everything happens here!
    results = hands.process(image)

    image.flags.writeable = True
    image = cv2.cvtColor(image, cv2.COLOR_RGB2BGR)

    if results.multi_hand_landmarks:
      for hand_landmarks in results.multi_hand_landmarks:
        mp_drawing.draw_landmarks(image, hand_landmarks, mp_hands.HAND_CONNECTIONS)
    cv2.imshow("me", image)
    if cv2.waitKey(5) & 0xFF == 27:
      break
In the above code, mp_drawing is a helper function provided by Mediapipe for drawing the landmarks. Here is the result:

You can access the position of each landmark using hand_landmarks.landmark[i] where i is the desired part of the hand, as you can see in the previous figure, for example hand_landmarks.landmark[4] gives us the thumb fingertip. Now let’s print its position for each frame:
if results.multi_hand_landmarks:
      for hand_landmarks in results.multi_hand_landmarks:
        mp_drawing.draw_landmarks(image, hand_landmarks, mp_hands.HAND_CONNECTIONS)
        print(hand_landmarks.landmark[4])
The result would be something like this:
x: 0.5257267355918884
y: 0.7804418802261353
z: -0.06916474550962448

x: 0.5397517085075378
y: 0.7805351614952087
z: -0.0730966255068779

x: 0.5662820935249329
y: 0.793177604675293
z: -0.09342499077320099

x: 0.5701954364776611
y: 0.806795060634613
z: -0.04820246249437332

x: 0.6754463315010071
y: 0.969791054725647
z: -0.10953305661678314
In the output x, y, z are the components of the position vector of the landmark that in this case is the thumb fingertip. Note that x and y are normalized by image width and height respectively. So to obtain an unnormalized position you just need to multiply them by image width and height respectively and don’t forget to convert the result to int. So now we have the position of hand let’s move to the physical part!
What About The Physical Part?
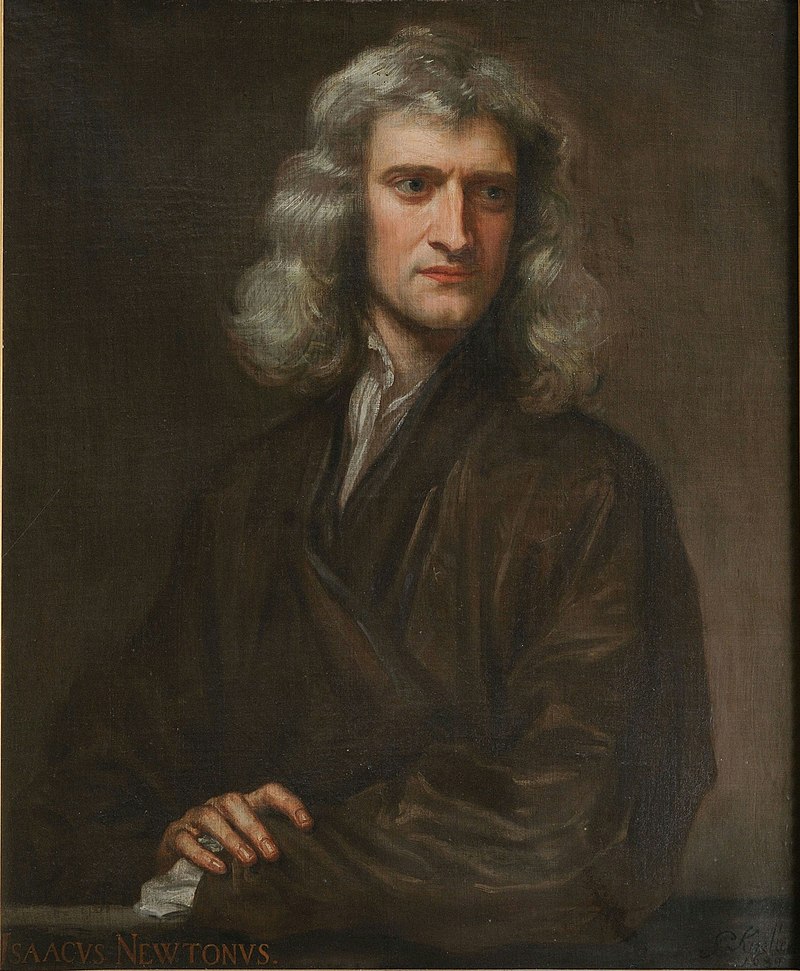
OK, We should now deal with the hard part. Although the man in the above picture made our job much easier, still to handle the collision of the hand and the balls it’s not easy to apply all of the rules which he and his physicist friends have discovered. Of course, we should thank him also for the hand tracking part since without calculus we wouldn’t be able to do that :) Anyway let’s forget him for now, you can just pick a classical mechanics book and it can tell you what happens when the balls and hand collide. But is that enough for solving this part? No! physics tells you what happens when several objects collide, But it can’t tell you when they collide. you have to detect collisions and that classical mechanics book can not help you with this. Please don’t even think about checking every two objects for collision at each time step! it’s too inefficient when you have many objects and the objects have a complicated shape. Efficient collision detection is a problem in computational geometry. There are many methods to speed up collision detection like pruning or spatial partitioning. see the references if you wanna know more about this problem.
OK, it’s a hard problem! What we can do?
What Is A Physics Engine?
Physics engines are developed for solving the problems which I discussed in the previous section and much more than that. But how does it work? It’s very simple (unless you wanna create your own). First, you define a world and some objects or bodies inside it, you can set the shape, mass, and many other properties for your objects as you like. After that, the physics engine can simulate this world and gives you the position and angle of the bodies at each time. As you can guess almost every game engine and many simulation systems use physics engines.
 Many types of physics engine have been developed and you can choose anyone you like, some of them only support 2D dynamics and some are developed for 3D dynamics and some even support fluid dynamics, here’s a list of some popular physics engines:
- Nvidia PhysX
- Havok
- Unity has a Physics Engine
- Box2D
- Chipmunk
- Open Dynamics Engine
- Newtonian Dynamics
- React Physics 3D
- Bullet
- PyChrono
- Pymunk (built on top of Chipmunk)
- …
Most of the physics engines have been written in C/C++ but some of them provide API for other languages like python. For our simple game, we can use Pymunk.
Pymunk
Pymunk is a simple 2D physics library that supports rigid body dynamics. you can install it simply using pip:
pip install pymunk
Before using it for our project, let’s write a simple example to understand it better. import Pymunk, OpenCV, Numpy, and time. we can use OpenCV for drawing graphics, but note that this is not the purpose of OpenCV and for a real game it is better to use a rendering library like OpenGL.
import pymunk
import cv2
import numpy as np
import time
Next, we define the space that contaions our objects, some other game engines call it world. Additionally, we define a downward gravity for it just like our planet:
space = pymunk.Space()
space.gravity = 0,-1000
Now we define 8 balls and assign each one a circle shape. the positions list contains the x,y position of the balls and 10 is the radius of each ball. the arguments passed to pymunk.Body are mass and moment respectively. You can also set other properties like friction coefficient, etc. check the Pymunk docs for details.
positions = [(190, 300), (200, 350), (195, 320), (193, 340), (190, 360), (200, 370), (195, 380), (193, 390)]
bodies = []
for position in positions:
    body = pymunk.Body(1, 1)
    body.position = position
    shape = pymunk.Circle(body, 10)
    space.add(body, shape)
    bodies.append(body)
Next, We need a ground, we define a simple line segment as ground:
gx1, gy1, gx2, gy2 = 100, 10, 300, 10
ground = pymunk.Segment(space.static_body, (gx1, gy1), (gx2, gy2), 5)
space.add(pymunk.Body(body_type=pymunk.Body.STATIC), ground)
The physics engine will handle computations needed for the collision of balls, All we need to do is defining a function that draws our space at each step:
def draw():
    page = np.ones((400, 600, 3))
    cv2.line(page, (gx1, page.shape[0]-gy1), (gx2, page.shape[0]-gy2), (255, 0, 0), 5)
    for body in bodies:
        xb = int(body.position[0])
        yb = int(page.shape[0]-body.position[1])
        cv2.circle(page, (xb, yb), 10, (0, 0, 255), -1)
    cv2.imshow("World", page)
Note that OpenCV uses the matrix coordinate system in which the y axis is downward but Pymunk works with an upward y-axis so we should convert the y component when drawing our objects.
Finally, we run a loop, and at each step, ask the physics engine to take one step then draw the space and its objects:
while True:
    time.sleep(0.03)
    space.step(0.02)
    draw()

    # closing the window
    if cv2.waitKey(5) & 0xFF == 27:
      break
Finally, You can see an output like this:
Amazing! So we are ready to write our game.
Putting Everything Together
To create our simple augmented reality game, We detect the hand points then define those points and also a few balls as bodies for Pymunk.
Start by importing Pymunk, OpenCV, Mediapipe, and Numpy:
import pymunk
import cv2
import numpy as np
import mediapipe as mp
mp_hands = mp.solutions.hands
Then we define our space and again with a downward gravity:
space = pymunk.Space()
space.gravity = 0, -500
Next, we create 50 balls with random initial positions and assign each one a circle shape:
balls_radius = 12
balls = [(300 + np.random.uniform(-30, 30), 400 + 50*i + 0.5*i**2) for i in range(50)]

balls_body = [pymunk.Body(100.0, 1666, body_type=pymunk.Body.DYNAMIC) for b in balls]

for i, ball in enumerate(balls_body):
    balls_body[i].position = balls[i]
    shape = pymunk.Circle(balls_body[i], balls_radius)
    space.add(balls_body[i], shape)
As you know, for handling the collision of the hand and balls we should define the hand as a body for the physics engine. There are many ways to do that. I will use a very simple trick to keep the project as simple as possible. Let’s just define each landmark as a ball and for simplicity forget about their connections. Since Mediapipe can detect 21 landmarks for each hand, we define 21 balls:
fingers_radius = 20
fingers = [pymunk.Body(10, 1666, body_type=pymunk.Body.KINEMATIC) for i in range(21)]
for i, finger in enumerate(fingers):
    finger_shape = pymunk.Circle(fingers[i], fingers_radius)
    space.add(fingers[i], finger_shape)
OK, you already know how to detect the landmarks using Mediapipe but now we should somehow connect the position of the balls that we have defined for hand landmarks and the positions given by Mediapipe. you may think that we can just update the position at each step like this:
for hand_landmarks in results.multi_hand_landmarks:
  for i, finger in enumerate(fingers):
    x = int(hand_landmarks.landmark[i].x * image.shape[1])
    y = image.shape[0]-int(hand_landmarks.landmark[i].y * image.shape[0])
    fingers[i].position = x, y
But this approach is troublesome. Why? take a look:
As you can see sometimes the balls pass the hand, Note the physics engine is the owner of the position, we can’t change the position instantly and expect everything works well. we may instead update the velocity. we can obtain the velocity vector by subtracting the previous position from the current position vector like this:
for hand_landmarks in results.multi_hand_landmarks:
  for i, finger in enumerate(fingers):
    x = int(hand_landmarks.landmark[i].x * image.shape[1])
    y = image.shape[0]-int(hand_landmarks.landmark[i].y * image.shape[0])
    fingers[i].velocity = 14.0*(x - fingers[i].position[0]), 14.0*(y - fingers[i].position[1])
Note that in the above code the velocity vector is multiplied by 14.0 to increase the update speed.
Before drawing the objects, let’s define a list of colors for the balls:
colors = [(219,152,52), (34, 126, 230), (182, 89, 155),
          (113, 204, 46), (94, 73, 52), (15, 196, 241),
          (60, 76, 231)]
Drawing the balls is trivial, here is the complete source code:
# A toy project with OpenCV, PyMunk and Mediapipe
import pymunk
import cv2
import numpy as np
import mediapipe as mp
mp_hands = mp.solutions.hands

# define the space for handling physics
space = pymunk.Space()
space.gravity = 0, -500

# define balls as dynamic bodies for physics engine
balls_radius = 12
balls = [(300 + np.random.uniform(-30, 30), 400 + 50*i + 0.5*i**2) for i in range(50)]
balls_body = [pymunk.Body(100.0,1666, body_type=pymunk.Body.DYNAMIC) for b in balls]
for i, ball in enumerate(balls_body):
    balls_body[i].position = balls[i]
    shape = pymunk.Circle(balls_body[i], balls_radius)
    space.add(balls_body[i], shape)


# define fingers as kinematic bodies for physics engine
fingers_radius = 20
fingers = [pymunk.Body(10,1666, body_type=pymunk.Body.KINEMATIC) for i in range(21)]
for i, finger in enumerate(fingers):
    finger_shape = pymunk.Circle(fingers[i], fingers_radius)
    space.add(fingers[i], finger_shape)

# a few color for drawing balls
colors = [(219,152,52), (34, 126, 230), (182, 89, 155),
          (113, 204, 46), (94, 73, 52), (15, 196, 241),
          (60, 76, 231)]

# reading the video from webcam
cap = cv2.VideoCapture(0)
with mp_hands.Hands(
    min_detection_confidence=0.7, min_tracking_confidence=0.7) as hands:
    while True:
        success, image = cap.read()
        image = cv2.cvtColor(cv2.flip(image, 1), cv2.COLOR_BGR2RGB)
        image.flags.writeable = False
        results = hands.process(image)
        image.flags.writeable = True
        image = cv2.cvtColor(image, cv2.COLOR_RGB2BGR)

        if results.multi_hand_landmarks:
            for hand_landmarks in results.multi_hand_landmarks:
                for i, finger in enumerate(fingers):
                    # converting the coordinates
                    x = int(hand_landmarks.landmark[i].x * image.shape[1])
                    y = image.shape[0]-int(hand_landmarks.landmark[i].y * image.shape[0])
                    # update the velocity of balls
                    fingers[i].velocity = 14.0*(x - fingers[i].position[0]), 14.0*(y - fingers[i].position[1])

	# getting the position of balls from physics engine and drawing
        for i, ball in enumerate(balls_body):
            xb = int(ball.position[0])
            yb = int(image.shape[0]-ball.position[1])
            cv2.circle(image, (xb, yb), balls_radius, colors[i%len(colors)], -1)

        # take a simulation step
        space.step(0.02)

        cv2.imshow("game", image)
        if cv2.waitKey(5) & 0xFF == 27:
            break
Finally the output :)
What To Do Next?
There are many ideas you can try.
- read the Pymunk documentation and try to create other types of objects
- hand tracking is not the only thing you can do. for example you can use pose estimation to create interesting applications
- try other physics engines
- try to make a 3D AR game
- add sound effects when a collision happens
- find a proper rendering library and try to create your own game engine
- …
Further Reading
If you are interested in the collision detection problem, this book is a complete resource:
- Real-Time Collision Detection, Christer Ericson, Morgan Kaufmann, 2005
This paper may help you if want to know more about hand tracking:
- Analysis of the hands in egocentric vision: A survey, Andrea Bandini, José Zariffa, arXiv:1912.10867 [cs.CV]